
Description
Based on the same counter with the particle theory of light scattered by a unique detection method, it Will be seized within the unit volume, equivalent to the absolute number of particles as a pulse signal output. Can sense smoke particles produced smoke, dust and other allergic Housing Can detect more than 1 micron or 2.5 micron particles of two small threshold. Small volume, light weight, easy to install. 5V input circuit, to facilitate signal processing. Built-in air generator, free to attract external atmosphere. Maintenance is simple, keeping the long term characteristics of the sensor. Purpose: Air Cleaner, air conditioners, ventilation fans, environmental monitoring
Feature:
- Rated Power: 0.5W
- Operating Voltage: 5V
- Operating Current: 100mA
- Open Circuit Current: 106mA
- Operating Temperature: -20+or-85 degree
- Light Intensity: 1000W/M2, 25 degree,AM1.5
Pinout and description:
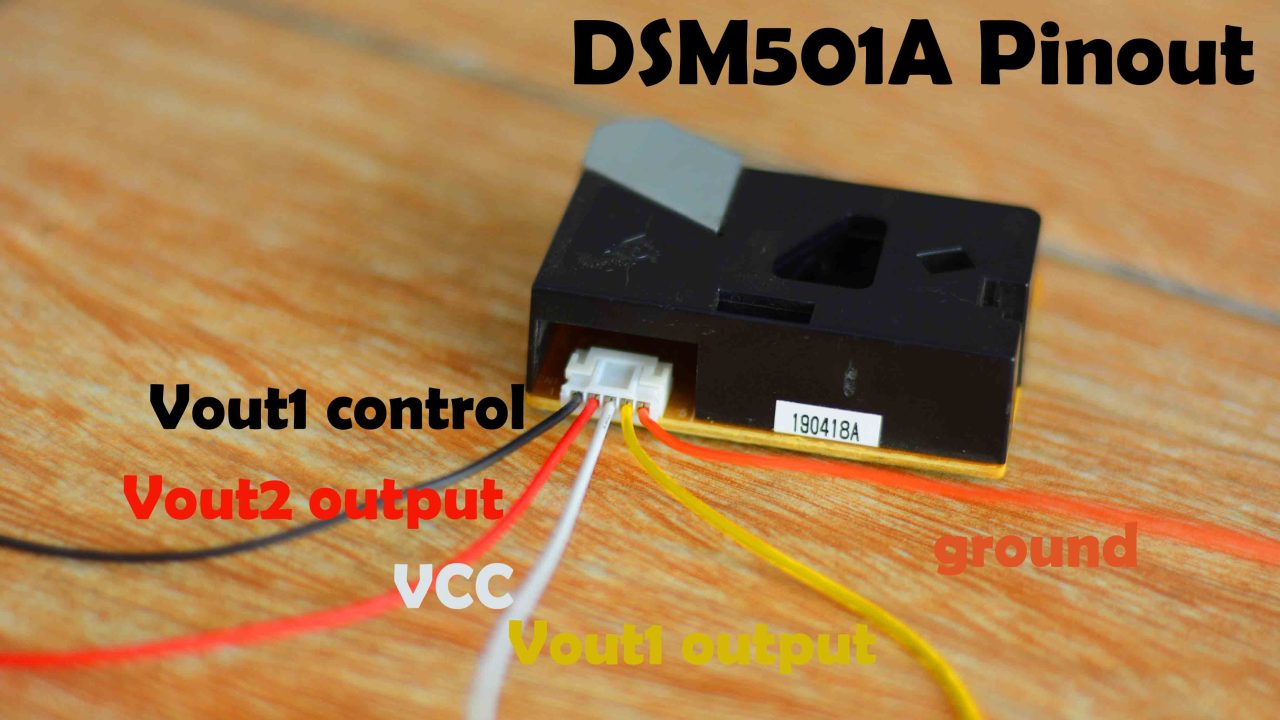
It has a total of 5 wires. And don’t get confused with the colors. Just follow the pin numbers. As per the datasheet,
- Pin number 1 is the Vout1 control.
- Pin number 2 is the Vout2 output(PWM).
- Pin number 3 is the VCC.
- Pin number4 is the Vout1 output (PWM). And
- Pin number 5 is the ground.
To interface the DSM501A Dust Sensor Module with an Arduino, you can follow these steps:
- Wiring Connections:
- Connect the VCC pin of the DSM501A module to the 5V pin on the Arduino.
- Connect the GND pin of the DSM501A module to the GND pin on the Arduino.
- Connect the OUT pin of the DSM501A module to any digital pin on the Arduino (e.g., Pin 2).
- Arduino Code: Here is a simple example code snippet to read data from the DSM501A Dust Sensor Module and print the output to the serial monitor:
const int dustPin = 2;//Connect the OUT pin to digital pin 2
 void setup() {
   Serial.begin(9600);
   pinMode(dustPin, INPUT);
 }
 void loop() {
   int dustVal = digitalRead(dustPin);
   Serial.print("Dust Value: ");
   Serial.println(dustVal);
   delay(1000); // Delay for 1 second
 }


or use this codes
- Testing:
- Upload the code to your Arduino board.
- Open the Serial Monitor in the Arduino IDE (Tools > Serial Monitor).
- You should see the dust sensor values being printed in the Serial Monitor.
Remember, the output from the DSM501A Dust Sensor Module may require calibration and processing to convert the raw data into meaningful PM2.5 concentration values. Refer to the sensor’s datasheet or calibration guide for more information on interpreting the sensor readings.

Reviews
There are no reviews yet.