


Description
The Arduino Pro Mini is a microcontroller board based on the ATmega328P.
It has 14 digital input/output pins (of which 6 can be used as PWM outputs), 6 analog inputs, an on-board resonator, a reset button, and holes for mounting pin headers. A six pin header can be connected to an FTDI cable or Sparkfun breakout board to provide USB power and communication to the board.
The Arduino Pro Mini is intended for semi-permanent installation in objects or exhibitions. The board comes without pre-mounted headers, allowing the use of various types of connectors or direct soldering of wires. The pin layout is compatible with the Arduino Mini.
There are two version of the Pro Mini. One runs at 3.3V and 8 MHz, the other at 5V and 16 MHz.
Specifications
| Microcontroller | ATmega328P * |
| Board Power Supply | 3.35 -12 V (3.3V model) or 5 – 12 V (5V model) |
| Circuit Operating Voltage | 3.3V or 5V (depending on model) |
| Digital I/O Pins | 14 |
| PWM Pins | 6 |
| UART | 1 |
| SPI | 1 |
| I2C | 1 |
| Analog Input Pins | 6 |
| External Interrupts | 2 |
| DC Current per I/O Pin | 40 mA |
| Flash Memory | 32KB of which 2 KB used by bootloader * |
| SRAM | 2 KB * |
| EEPROM | 1 KB * |
| Clock Speed | 8 MHz (3.3V versions) or 16 MHz (5V versions) |
Getting Started
Connections
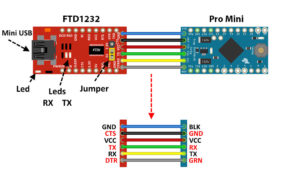
- FTDI: Pro Mini
- GND: BLK
- CTS: GND
- VCC: VCC
- TX: RX
- RX: TX
- DTR: GRN
Use your Arduino Pro Mini on the Arduino Desktop IDE
If you want to program your Arduino Pro Mini while offline you need to install the Arduino Desktop IDE.
Required Components
- FTDI Adapter Converter FT232RL
- Arduino Pro Mini
- Jumper wires
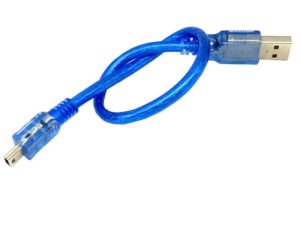
The Pro Min board comes without built-in USB circuitry, so an off-board USB-to-TTL serial converter must be used to upload sketches. If using the FTDI cable on Windows, you’ll need to make one configuration change to enable the auto-reset. With the board connected, open the Device Manager (in Control Panels > System > Hardware), and find the USB Serial Port under Ports. Right-click and select properties, then go to Port Settings > Advanced and check Set RTS on Close under Miscellaneous Options.
Open your first sketch
Open the LED blink example sketch: File > Examples >01.Basics > Blink.
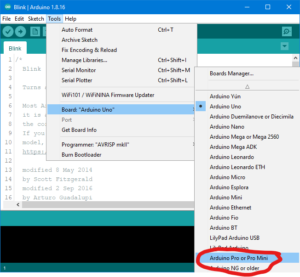
Select your board type (Arduino Pro or Pro Mini) and port
Upload and Run your first Sketch
To upload the sketch to the Arduino Pro Mini, you need to press the upload button in the Arduino environment.
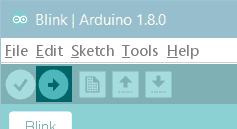
Click the Upload button in the upper left to load and run the sketch on your board:
Wait a few seconds – you should see the RX and TX LEDs on the board flashing. If the upload is successful, the message “Done uploading.” will appear in the status bar.
Package includes:
1×Arduino Pro Mini 328 - 5V/16MHz
Ishimwe William –
nice