Description
LCD stands for Liquid Crystal Display. This is a basic 16 character by 2 line display Yellow Back light . Utilizes the extremely common HD44780 parallel interface chipset. You will need 7 general I/O pins(If use in 4-bit Mode) to interface to this LCD screen. Includes LED backlight.
Features
- LCD display module with Yellow Backlight
- SIZE : 16×2 (2 Rows and 16 Characters Per Row)
- Can display 2-lines X 16-characters
- Operate with 5V DC
- Wide viewing angle and high contrast
- Built-in industry standard HD44780 equivalent LCD controller
- Commonly Used in: Student Project, Collage,copiers, fax machines, laser printers, industrial test equipment, networking equipment such as routers and storage devices
- LCM type: Characters
How to get started with LCD 16×2
LCD (Liquid Crystal Display) screen is an electronic display module and find a wide range of applications. A 16×2 LCD display is very basic module and is very commonly used in various devices and circuits. These modules are preferred over seven segments and other multi segment LEDs. The reasons being: LCDs are economical; easily programmable; have no limitation of displaying special & even custom characters (unlike in seven segments), animations and so on. A 16×2 LCD means it can display 16 characters per line and there are 2 such lines. In this LCD each character is displayed in 5×7 pixel matrix. This LCD has two registers, namely, Command and Data. The command register stores the command instructions given to the LCD. A command is an instruction given to LCD to do a predefined task like initializing it, clearing its screen, setting the cursor position, controlling display etc. The data register stores the data to be displayed on the LCD. The data is the ASCII value of the character to be displayed on the LCD.
Overview
Testing Character LCD
First, connect the 5V and GND pins from the Arduino Uno to the breadboard power rails and get your LCD plugged into the breadboard.
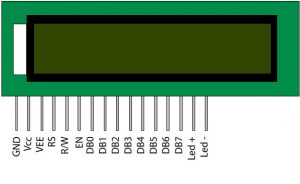
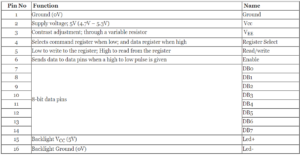
Now we’ll power up the LCD. The LCD has two separate power connections; One (Pin 1 and Pin 2) for the LCD itself and another one (Pin 15 and Pin 16) for the LCD backlight. Connect pins 1 and 16 on the LCD to GND and pins 2 and 15 on the LCD to 5V.
Next we’ll make connections for Pin 3 on the LCD which controls the contrast and brightness of the display. In order for fine contrast adjustments we’ll connect a 10K potentiometer between 5V and GND; connect the center pin (wiper) of the potentiometer to pin 3(Vo) on the LCD.

That’s it! Now turn on the Arduino, you’ll see the backlight light up. And as you rotate the knob on the potentiometer, you should notice the first line of rectangles appear. If this happens, Congratulations! Your LCD is doing just fine.
In this tutorial you will learn how to use LCD 16×2 display with Arduino uno. Also you will learn how to display live data from a sensor. In our case we are going to use a DHT22 temperature and humidity sensor.
Parts needed
- Arduino uno
- LCD 16×2
- DHT22 temperature and humidity sensor
- jumper wires
- 10k Ohm resistor
- 10k potentiometer
- 220 ohm Resistor
Before we starting Uploading Arduino sketches, We must do the following hardware connection.

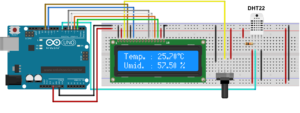
The connections are easy, see the image above with the breadboard circuit schematic.
Arduino library and sample code
After making the circuit as shown above we are going to download Adafruits’s DHT library from their github page. To download, click the DOWNLOADS button in the top right corner. Rename the uncompressed folder DHT and make sure that it contains the dht.cpp file and others. Then drag the DHT folder into the arduinosketchfolder/libraries/ folder. You may have to create that libraries sub-folder if it doesn’t exist. Restart the IDE. MPORTANT: As of version 1.3.0 of the DHT library you will also need to install the Adafruit_Sensor library, which is available from the Arduino library manager. Another library Liquid Crystal. After installing the libraries, it’s time for testing our LCD and DHT22 temperature sensor.
If you made the circuit 1 well as in the schematic, upload the following test sketch will print ‘Hello World!’ message on the LCD. Try the sketch out and then we will dissect it in some detail.
// include the library code:
#include <LiquidCrystal.h>

// Creates an LCD object. Parameters: (rs, enable, d4, d5, d6, d7)
LiquidCrystal lcd(12, 11, 5, 4, 3, 2);

void setup()
{
// set up the LCD's number of columns and rows:
lcd.begin(16, 2);

// Clears the LCD screen
lcd.clear();
}

void loop()
{
// Print a message to the LCD.
lcd.print(" Hello world!");

// set the cursor to column 0, line 1
// (note: line 1 is the second row, since counting begins with 0):
lcd.setCursor(0, 1);
// Print a message to the LCD.
lcd.print(" LCD Tutorial");
}
If everything goes right, you should see something like this on the display.

Testing our DHT22 temperature sensor
If you made the circuit 2 well as in the schematic upload this code to your Arduino UNO board.
CODE:
#include "DHT.h" //including the dht22 library
#include "LiquidCrystal.h"
#define DHTPIN 7 //Declaring pin 9 of arduino for the dht22
#define DHTTYPE DHT22 //Defining which type of dht22 we are using (DHT22 or DHT11)
DHT dht(DHTPIN, DHTTYPE); //Declaring a variable named dht
LiquidCrystal lcd(12, 11, 5, 4, 3, 2); // Initializing the LCD pins.
void setup() { //Data written in it will only run once
lcd.begin(16,2); // Initializes the interface to the LCD screen, and specifies the dimensions (width and height) of the display
dht.begin(); //This command will start to receive the values from dht22
}
void loop() { //Data written in it will run again and again
lcd.clear();
float hum = dht.readHumidity(); //Reading the humidity and storing in hum
float temp = dht.readTemperature(); //Reading the temperature as Celsius and storing in temp
// Check if any reads failed and exit early (to try again).
if (isnan(hum) || isnan(temp)) {
lcd.print("Failed to read");
delay(1000);
return;
}
lcd.setCursor(0,0); //Setting the cursor at the start of the LCD
lcd.print("Temp.: "); //Writing the temperature on the LCD
lcd.print(temp); //Writing the value of temperature on the LCD
lcd.print(" C");
lcd.setCursor(0,1); //setting the cursor at next line
lcd.print("Humi.: "); //Writing the humidity on the LCD display
lcd.print(hum); //Writing the humidity value stored in hum on the LCD display
lcd.print(" %");
delay(2000);
}
Your LCD display should print the temperature and humidity of the room you are into ( if you’re into a room like I am, you can go outside also to see if the DHT22 will show you different value). The value are presented in degree Celsius . The value heat point is the temperature we feel while the temperature is the actual thermometer reading.

Package includes:
1×LCD 16x2 1602
1×Male Single Row Pin header (16pins)