Description

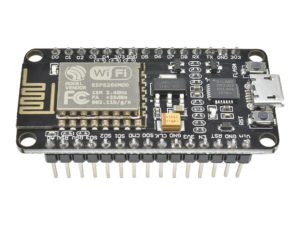
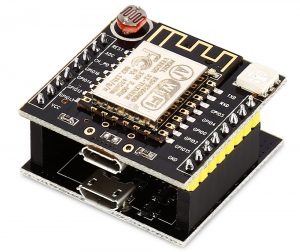
 Witty Cloud board is one of the cheapest ESP8266 device you can get on the market. It has a microUSB port with USB-Serial interface, which means no soldering! The board also contains an RGB LED and a button, which allows me to use it without a breadboard.
Features
- Open-source, Interactive, Programmable, Low cost, Simple, Smart, WI-FI enabled.
- Arduino-like hardware IO
- Advanced API for hardware IO, which can dramatically reduce the redundant work for configuring and manipulating hardware.
- Code like arduino, but interactively in Lua script.
- Nodejs style network API
- Greatly speed up your IOT application developing process.
- Wi-Fi MCU ESP8266 integrated and easy to prototyping development kit.
How to get started with Witty Cloud Board
Witty cloud board is an ESP8266-12 based WiFi board. In a short description, it is freely programmable microcontroller. The witty cloud board is faster, has more memory, and the best thing: it has a built-in WiFi. Basically, it’s a board with an ESP-12-F, a USB connector that delivers power, a little pushbutton, a LDR(Photoresistor) and a RGB-LED. So there’s plenty of hardware to play with. When you buy the module, you receive a stack of two PCBs. The lower one has a second USB connector, which is equipped with a serial converter. So it’s not only used as a power source, but also as a programming and debugging interface. Furthermore, there’s a reset- and a flash-button on the lower board. After programming, you just need the upper board, and you can even send newer firmware versions to it over the air (OTA). Despite having flash/reset buttons It only seem to program it from the Arduino IDE with the NodeMCU v1.0 profile which does the DTR reset thing, the Witty cloud board starts in flash mode as soon as you plug it in.
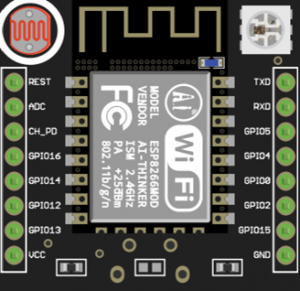
The pin out description
On the upper board there are several IO pins used by this micro controller. Below there is detailed table describing each pin and what it does.
| Label | Pin (Arduino) | Purpose |
|---|---|---|
| REST | — | Reset |
| ADC | A0 | Analog input, connected to LDR |
| CH_PD | — | Chip Power-Down |
| GPIO16 | D0 | GPIO, freely usable |
| GPIO14 | D5 | GPIO, freely usable |
| GPIO12 | D6 | GPIO, green channel of RGB-LED |
| GPIO13 | D7 | GPIO, blue channel of RGB-LED |
| VCC | — | +5V power |
| TXD | TX | Serial interface |
| RXD | RX | Serial interface |
| GPIO5 | D1 | GPIO, freely usable |
| GPIO4 | D2 | GPIO, connected to pushbutton |
| GPIO0 | D3 | GPIO, connected to flash-button, not really freely usable |
| GPIO2 | D4 | GPIO, connected to blue LED on the ESP-Module |
| GPIO15 | D8 | GPIO, red channel of RGB-LED |
| GND | — | Ground |
The pin labeled GPIO15 is connected also to the Red channel of the RGB-LED, in the Arduino environment it’s called D8. The pin labeled GPIO13 is connected to the blue channel of the RGB-LED, in the Arduino environment it’s called D7. Lastly the pin labeled GPIO12 is connected to the Green channel of the RGB-LED, in the Arduino environment it’s called D6. The pin labeled GPIO4 is connected to the push button, in the Arduino environment it’s called D2. The LDR is wired to the ADC pin, in Arduino environment it’s called A0 and gives readings from 0-1023.
Getting Started – Connect the Witty cloud board to Your Computer
The Witty Cloud board comes without an USB cable. Make sure you have a data cable and not a ordinary charging cable. A data cable causes your Windows OS to react. It announces the attachment of a new hardware and tries to install the USB drivers. It either finds the driver on your system or it does not. If it does not then you will need to download the USB drivers. The USB interface chip is the CH340G. You will need to install the drivers for this chip. A Google search for the “CH340G drivers” finds several sites. You can download the Windows 7 drivers from here or the Windows 8 from here. Other operating systems can be downloaded from here.
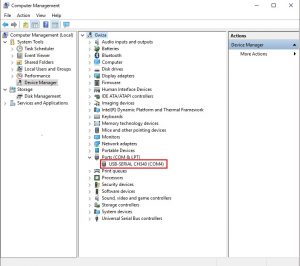
Is the Witty Cloud Board Happily Communicating With Your Computer?
Lets find out if the Witty cloud board and your computer are communicating with each other. Getting this step right is important for any further action. Open the Device Manager via Control Panel| Hardware and Sound.
Telling Arduino Where to Find the Witty Cloud board Library
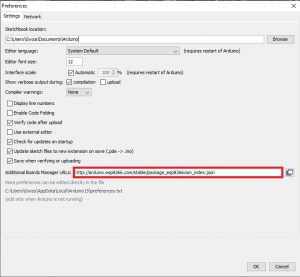
Open File/Preferences on your Arduino IDE.
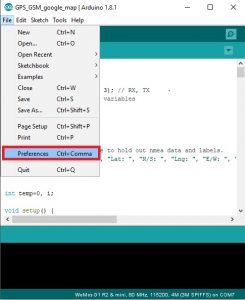
You must copy the following link and paste into your Preferences and Additional Board Manager URLs dialog and select OK: http://arduino.esp8266.com/stable/package_esp8266com_index.json Either case do not click on the URL.
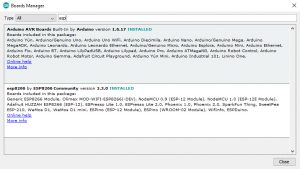
Installing the Witty Cloud board Board Via the Board Manager
Open Tools | Board:|Boards Manager and dialog box will pop out . Somewhere in the box of filter your search you will need to enter “esp8266 by ESP8266 Community ” select the latest version select that. The Install button will appear, click the Install button. Wait for a while… This process will take some time to download and complete. After the install it is a good idea to shut the Arduino program and restart it.
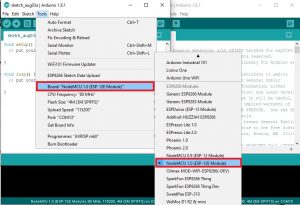
Selecting the Witty Cloud Board
Go to Tools | Board:… scroll way down and select NodeMCU v1.0 The Tools menu changes to the image shown above.
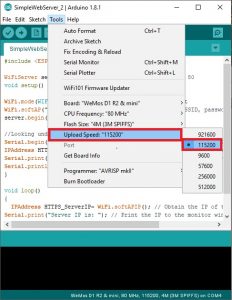
Configuring COM Port and COM port Speed
In a recent step we had determined the COM port Witty board appears on. To select the COM port, go to Tools | Port: and select the COM port, in my case it was COM12
Test Drive the Setup
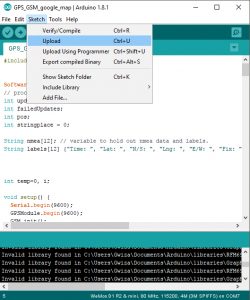
Test drive the complete setup using the boiler plate sketch. To upload the boiler plate sketch go to Sketch | Upload or use the shortcut key Crtl+U or click on the right arrow button next to the check mark. A successful compile and upload means all systems are working and we are ready to get to the real stuff.
Trying the Blink the onboard RGB
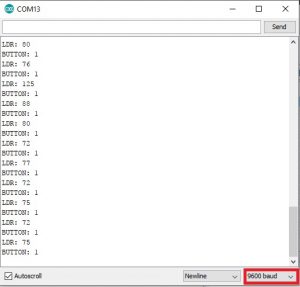
Download this WittyBlink sketch, compile it and upload the sketch as instructed in the previous step. Open your serial monitor and set a correct baud rate and try to hover your finger over the LDR and see the results in the serial monitor. The value will change as the light intensity goes down.
Programming a HTTP Server on Witty Cloud Board
In this tutorial, together we will undertake the journey of programming the Witty cloud board as an HTTP server. Using a web browser we will send instructions to the Witty Cloud Board to change it’s behavior. Throughout the process, at each step we will also look under the hood to see what is going on inside. While doing this we will control the on board LED to turn ON and OFF with commands issued via a web browser.
Note: One cannot change the behavior of the board without reprogramming it.
In an ideal world of IoT the Witty Cloud board should communicate with us over WiFi and over the the internet. We should be able to control the Witty Cloud board over Wifi using protocols specific to the internet. We should be able to instruct the Witty cloud Board to do “Things” without having to reprogram.
Opening the “Connect to a Network” Window
In your Windows environment open the Network and Sharing Center. You get to the Network and Sharing Center via the Control Panel. Click on Connect to a network to open theConnect to a network window. Leave it open, we will be referring to this window often. You may shut the Network and Sharing Center.
or
Turn your WiFi adapter ON and leave it open.
Writing the WittyWebServer Sketch
Connect your ESP8266-12E to your computer. Open your Arduino program/IDE and open the following code. This code will be a part of every ESP8266 sketch we write. This code does the following:
– Includes the ESP8266 library ESP8266WiFi.h.
– Creates the instance “server” of the class “WiFiServer” listening on port 80. Notice “server” is a global instance.
– Set the mode of our ESP8266 to be an Access Point (AP).
– Provide the SSID and password. The password / passphrase has to be at least 8 characters long.
– Fire-up our server by calling the begin() method.
Save as WittyWebServer sketch. Compile and upload the sketch to your OTA WeMos WiFi development board.
Checking Our Server
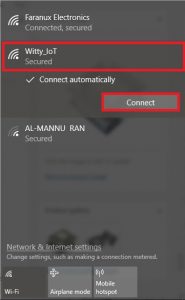
Open your wifi settings and connect to the network SSID called Witty_IoT with the password 12345678 provide the password/passphrase and save it.
Note: Our ESP8266-12E is operating as a HTTP server listening on port 80.
Get HTTP Server Information From the ESP8266-12E
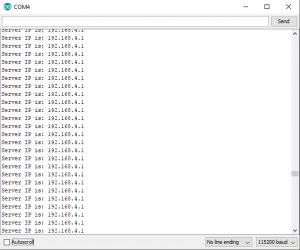
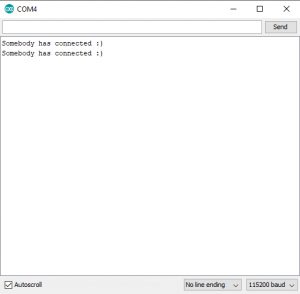
Open and Upload the following code into your OTA WeMos WiFi development board and Open your serial monitor and wait for the serial monitor to print out the default IP address of the ESP8266-12E as 192.168.4.1.
Web Browser Connects/Talks to Server
It is time for a web browser to connect to our HTTP server.Open the following code and Upload it to you OTA WeMos WiFi development board. Compile and load to the OTA WeMos WiFi development board. Open a browser window and enter http://192.168.4.1 and and hit enter.Observe your Monitor window to check for a connection.
Listen to What the Browser Is Sending to the HTTP Server
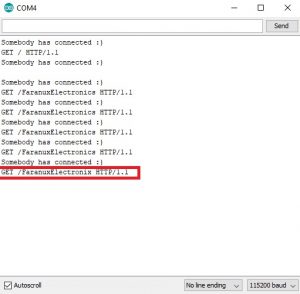
The web browser connects to the HTTP server and sends the request. The server receives the request and does something with it. Rather it can do a lot of different things. Open this code, Compile it and Upload it to your Witty Cloud board.Enter the following in the address field of your browser http://192.168.4.1/FaranuxElectronix The browser sends a GET request to the server.
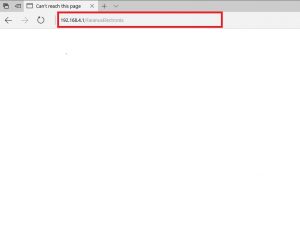
Notice “/faranuxElectronix” following the GET request. Off all the text sent we are only interested in the first line of the request.
Turning the LED ON/OFF Through the Web Browser
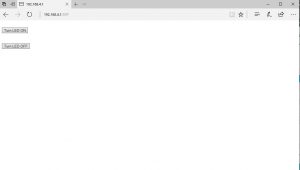
Firstly initialize the digital port GPIO5 as an output port and keep the initial state of the LED ON. Let us add some HTML code and some buttons. Open this code and Compile it and Upload it to your OTA WeMos WiFi development board. Open your browser and enter the following address 192.162.4.1 click on the Turn ON button to turn the LED On or Turn LED Off to turn it OFF.

Do the above circuit on your Witty Cloud board and open your web browser and enter the following adress 192.168.4.1
Happy IOTing!!!!
Ressources:
Arduino libraries: esp8266 by ESP8266 Community
Arduino sketch: