Description
E18-D80NK Infrared Obstacle Avoidance Sensor is a low-cost IR Proximity Sensor with an adjustable range of 3 cm to 80 cm. The E18-D80 sensor comes with IR Transmitter and IR receiver in one module. The IR transmitter transmits modulated IR signal, which is then reflected by the object in its path and then detected by the receiver. This sensor has less interference by sunlight because of the modulated IR light.
E18-D80 IR Sensor is widely used in robots to avoid obstacles, industrial assembly lines, Reverse Car Parking, and many other automation applications. The detection range can be adjusted according to the application using the multi-turn screw that is located at the back of the sensor. The switching signal output changes according to the obstacle detection. It remains high when no obstacles and changes to low when there are obstacles. A red LED is placed behind the probe that turns high whenever an obstacle is detected. The E18 sensor operates on 5V and consumes around 5mA to 30mA current without any load.
Features and Specifications
Getting along with the E18-D80NK IR Sensor
What to note first:
- The sensor has an adjustable detection distance and visible light interference. It is easy to use and is ideal for panel mounting.
- With nothing obstructing the sensor adjust the multi-turn screw at rear of sensor until the LED switches from off to on. The sensor should then be calibrated for its current environment.
E18-D80NK Pinout

Wiring the sensor with Arduino
Needed materials
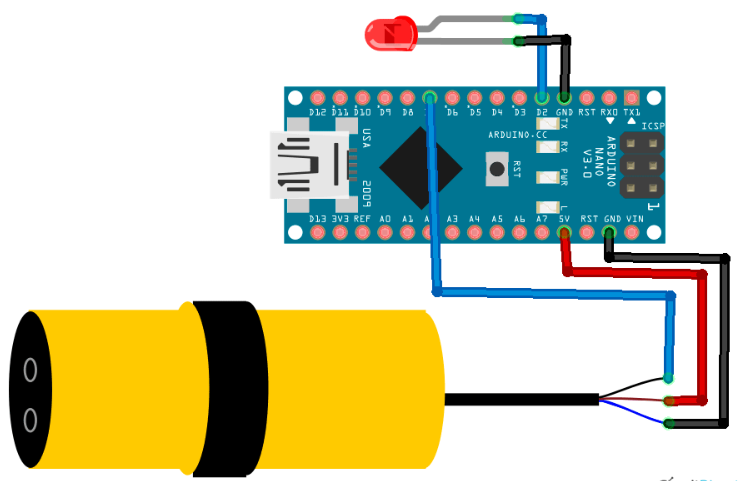
Note that one can connect tha data pin of the sensor on either digital pin of their preference. Now that everything is set, let’s take a look at the programming code to fully control it with Arduino
const int e18_sensor = 7;
const int led = 2;
void setup() {
Serial.begin(9600);
pinMode (e18_sensor, INPUT);
pinMode (led, INPUT);
}
void loop() {
int state = digitalRead(e18_sensor);
Serial.println(state);
if(state==LOW){
Serial.println(“Object Detected”);
digitalWrite(led, HIGH);
}
else {
Serial.println(“All Clear”);
digitalWrite(led, LOW);
}
delay(1000);
}
Package includes: 1xE18D-80NK