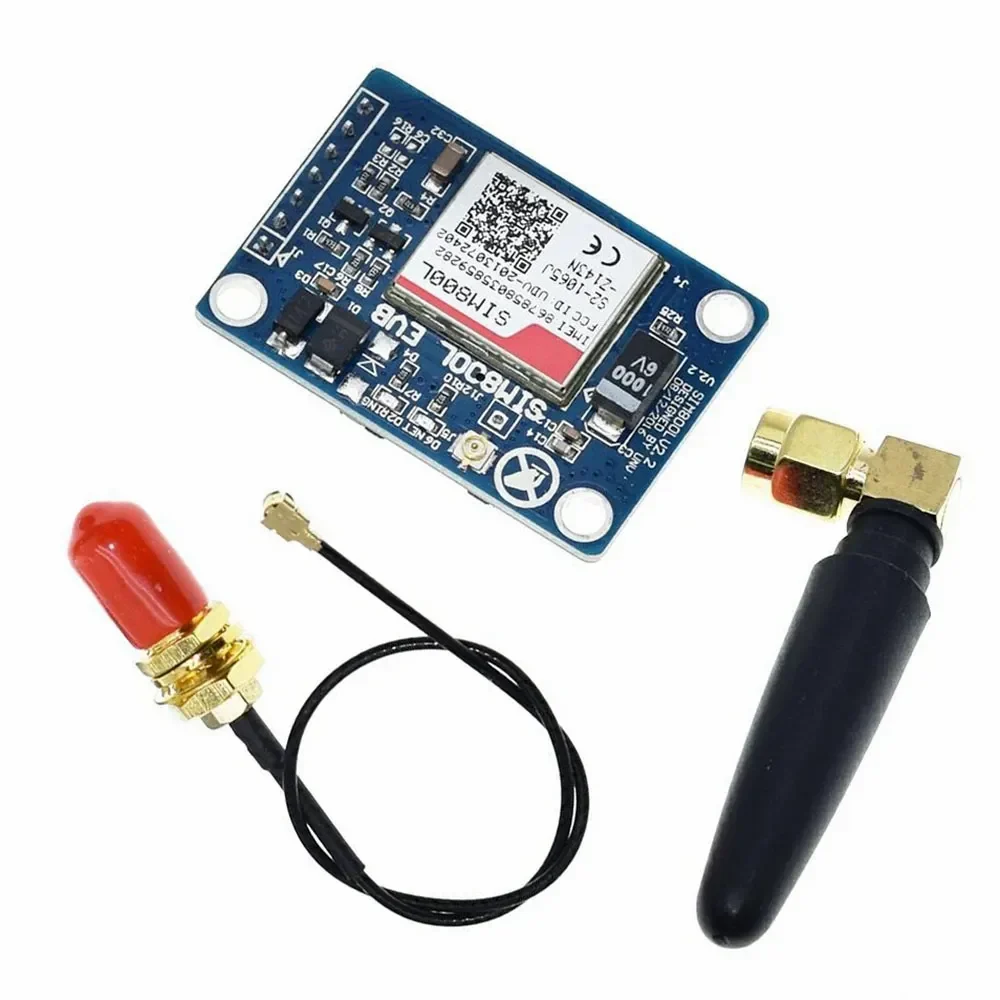
Description
Supply voltage: 3.2V~5.5V. (If the module you want to work long hours in the emission state, it is recommended that when the supply voltage exceeds 4.5V threaded a 1N4007 diode to prevent module built-in LDO heated)
Default address range (open field test): About 600m (maximum communication distance adjustable reach 1000m, the baud rate is 5000bps)
Default idle current: 16MA (In different working modes operating current is different)
Module dimensions: 27.8 x 14.4 x 4mm
Operating frequency range: 433.4-473.0MHz, up to 100 channels of communication
The maximum transmit power: 100mW (settable)
Module support software upgrade
Default factory settings: Mode FU3, baud rate is 9600bps, communication channels CH001 (433.4M)
AT command set:
Module parameters, AT command set
AT command is used to set the parameters of the function module and switching modules need to exit the setting mode after setting to take effect. Meanwhile, modify the parameters and functions, power-down is not lost.
Enter the command mode:
If you use an arduino uno, then connect Rx pin of the Bluetooth module to pin 3 of Arduino Uno(supposedly same for arduino mega), and Tx pin of Bluetooth to pin 2 of Arduino. Also connect SET pin of module to GND of arduino and ground to ground, but don’t connect the Vcc yet. You have to first power up the arduino, and then connect Vcc.

then copy paste the following code, which is just a modification of Software Serial example included in arduino examples.
#include <SoftwareSerial.h>
SoftwareSerial mySerial(2, 3); // TX, RX
void setup() {
Serial.begin(9600);
Serial.println(“Enter AT commands:”);
mySerial.begin(9600);
}
void loop()
{
if (mySerial.available())
Serial.write(mySerial.read());
if (Serial.available())
mySerial.write(Serial.read());
}
Instructions:
1. AT
Test instructions
Example: Send module commands “AT”, the module returns “OK”.

2. AT + Bxxxx
Change the serial port baud rate command. You can set the baud rate is 1200bps, 2400bps, 4800bps, 9600bps, 19200bps, 38400bps, 57600bps and 115200bps. The factory default is 9600bps.
Example: Set the module serial port baud rate is 19200bps, please send module command “AT + B9600”, the module returns
“OK + B9600”.

3. AT + Cxxx
Change the wireless communication channel, selectable from 001 to 127 (more than 100 radio channels after the communication distance not guaranteed). The default value is 001 radio channels, operating frequency is 433.4MHz. Step channel is 400KHz, the operating frequency of the channel 100 is 473.0 MHz.
Example:
Set module to channel 21, please send module command “AT + C001”, the module returns “OK + C001”.
After exiting the command mode, the module in the first 21 channels, operating frequency is 441.4 MHz.
Note: Because the wireless receiver module sensitivity HC-12 is relatively high, the baud rate is greater than when air 58000 bps, 5 must be shifted to the adjacent channel use. When the air baud rate is not greater than 58000 bps, if the short distance (10 meters) communication, but also need to stagger five adjacent channel use.

4. AT + FUx
Change the module serial pass-through mode, there FU1, FU2 and FU3 three modes. Module default mode is FU3, two serial pass-through mode module must be set to the same communication. See detailed above, “wireless serial pass-through” part.
Example: Send module commands “AT + FU3”, the module returns “AT + OK”.
5. AT + Px
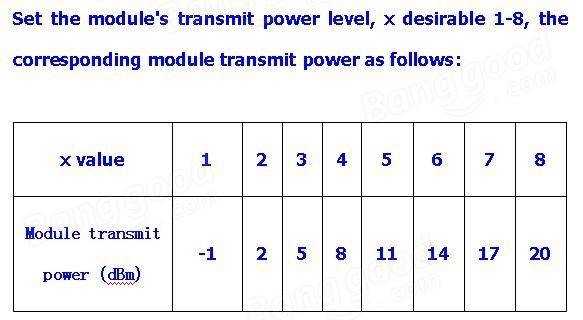
The default setting is 8, maximum transmit power, communication distances. Transmit power level is set to 1, the minimum transmission power. In general, the transmission power of each drop 6dB, communication distance will be reduced by half.
Example: Send module commands “AT + P 5”, the module returns “OK + P5”. After exiting the command mode, the module transmit power is +11 dBm.
Getting started with the 433Mhz HC-12 SI4463 Wireless Serial Port Module
In this example you will learn how to communicate between two 433mhz HC4463 Wireless serial port over a long distance . you will learn how to make a wireless instant messenger with the least effort possible.
Hardware required
- 2X Arduino UNO
- 2X HC-12 Wireless communication module
- Jumper wires
Connecting the Hardware


Arduino UNO HC-12 Wireless communication module
5V VCC
TXD D10
RXD D11
GND GND
Arduino Code
Here’s the Arduino code for this example, a basic communication between the two modules using the Serial Monitor.
The same code is used for both Arduinos
#include <SoftwareSerial.h>

SoftwareSerial HC12(10, 11); // HC-12 TX Pin, HC-12 RX Pin

void setup() {
  Serial.begin(9600);             // Serial port to computer
  HC12.begin(9600);               // Serial port to HC12

}

void loop() {
  while (HC12.available()) {        // If HC-12 has data
    Serial.write(HC12.read());      // Send the data to Serial monitor
  }
  while (Serial.available()) {      // If Serial monitor has data
    HC12.write(Serial.read());      // Send that data to HC-12
  }
}
We can connect the two Arduinos on two separate computers but also we can use a single computer.
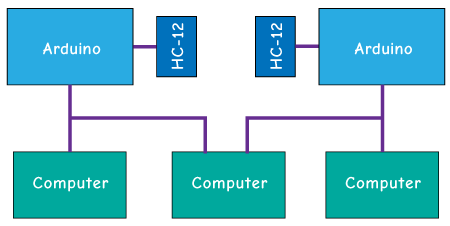
In that case, once we connect the first Arduino to the computer, we need to select the model and the COM port and upload the code to the Arduino. Then we connect the second Arduino and we have to start the Arduino IDE again in order to be able to select the other COM port to which our second Arduino is connected, and then upload the same code.
So once we have the two Arduino IDEs running we can start the serial monitors and test whether the communication works properly. Anything we type in the serial monitor will be sent from one to the other Arduino.