Description
Description:
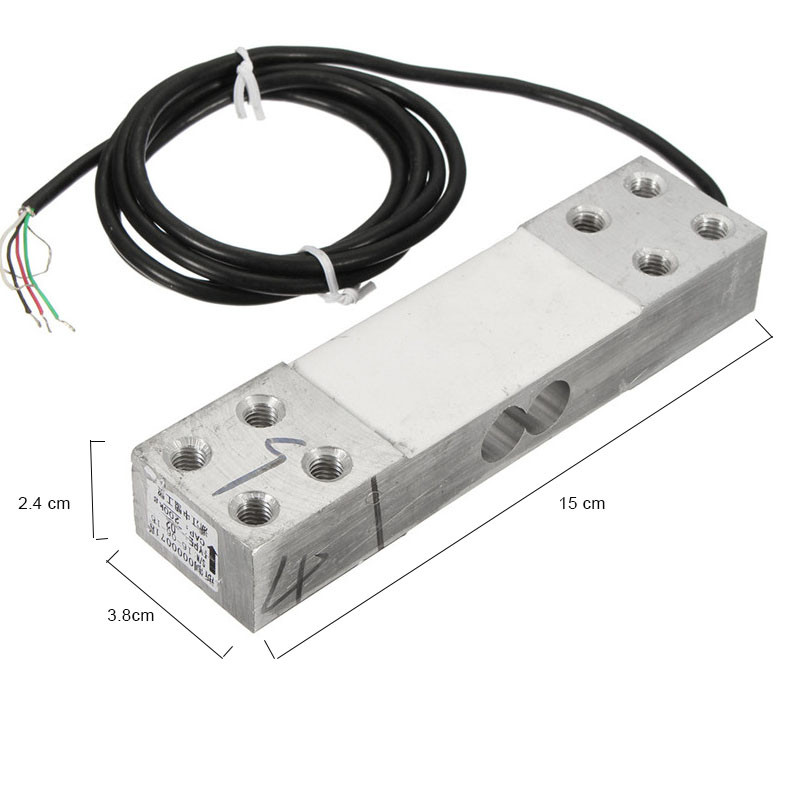
This straight bar load cell (also called a strain gauge) can translate up to 200kg of pressure (force) into an electrical signal. Each load cell is able to measure the electrical resistance that changes in response to, and proportional of, the strain (e.g. pressure or force) applied to the bar. With this gauge you will be able to tell just how heavy an object is, if an object’s weight changes over time, or if you simply need to sense the presence of an object by measuring strain or load applied to a surface.
Application:
- Strain measurement
- Digital and Analog Electronic Weighing scales
- Weight Balancing Machines
Specifications:
- Comprehensive error : 0.02% F.S
- Sensitivity :1.0 0.1mv / v
- Nonlinearity: 0.02% F.S
- Hysteresis: 0.02% F.S
- Importance of :0.02% F.S
- Creep: 0.02% F.S/10min
- 0:00 Output :2% F.S
- Input Impedance :405 10
- Output impedance :350 3
- Insulation resistance :5000M (100VDC)
- Excitation voltage :5VDC ~ 12VDC
- Temperature compensation range :10 ~ +40
- Operating temperature range: -20 ~ +60
- Temperature effect on zero 0.03% F.S/10
- Temmp.effect 0.02% F.S/10
- Safe overload 120%
- Ultimate Overload 150%
- Protection class IP65
- Dimensions: 150mm (L), 24mm (W), 38mm (H)
- Cable Length: 1 meter
- Weight : 320g
Pinouts:
- Red : E+
- Black: E-
- White: S+
- Green: S-
- Shield: GND
Getting started with the 200 Kg Scale Load Cell Weight Weighing Sensor
In the following discussions we will learn how to construct a digital weight scale machine using Arduino which can measure weights from few grams to 200 Kg with reasonable accuracy. We will be calibrating the proposed circuit and finalizing the weight scale machine.
What is a Load Cell?
A Load cell is an aluminium profile with strain gauge attached to 4 sides in Wheatstone bridge configuration.
Illustration of Load cell:

This type of load cell is rigid and used commonly in industries. There are 8 screw mounts, one side is bolted to a stationary surface and the other end is bolted to a holder (say basket) to hold the object to be measured.It has maximum weight specified on the datasheet or on its body, exceeding the specification might damage the load cell.
A full bridge cells consists of 5 terminals namely E+, E-, which are excitation wires through which the supply voltage is applied. The other two wires are S+ and S-, which are signal wires, from which the voltage is measured and other shield wire is Ground
Now these voltages are in millivolt range not strong enough for a microcontroller to read and process. We need amplification and tiny changes should be visible to the microcontroller. To do this there are dedicated module called load cell amplifiers, let’s take an overview on that.
Load cell Amplifier HX711:
Illustration of HX711 Load cell amplifier module:

The load cell amplifier is based on the IC HX711 which is 24-bit analog to digital converter specifically designed for weight measures. It has different selectable gains 32, 64 and 128 and it operates on 2.6 to 5.5 V.
This breakout board helps to detect tiny variation on load cell.
Hardware required
- 200 Kg Scale Load Cell Weight Weighing Sensor
- Arduino UNO
- HX711 Load Cell Amplifier
- Jumper wires
Connecting the Hardware
Load cell connection HX711 to Arduino and load cell.

The project consists of Arduino, Load cell and HX711 load cell amplifier board and a computer.
It can operate from 2.7 V to 5 V. The power is provided from Arduino board. The 200kg load cell has five wires generally, which is the output from the Wheatstone bridge configured strain gauge. The Red wire is E+, black wire is E-, green wire is A- and white wire is A+, shield wire is connected to the Ground. The DATA pin of HX711 is connected to pin #3 of Arduino and Clock pin of the HX711 is connected to pin #2 of Arduino.
How to Mount the Load cell:

The load cell has four or eight screw holes, two or four at both sides. Any one side must be stationary for best accuracy; it may be mounded to a wood with reasonable weight.A thin wood or thin plate can be used to hold the measuring weight as illustrated above. So when you place a weight, the load cell bend so does the strain gauge and change its resistance which is measured by HX711 module and fed to Arduino.
Once the hardware setup is complete, let’s upload the code and calibrate.
Calibrating the circuit:
There are two programs; one is the calibration program (finding the calibration factor). Another code is weight measurement program, the calibration factor found from the calibration program code need to be entered in weight measurement program.The calibration factor determines the accuracy of the weight measurement.
Download the HX711 library here
Calibrations Program code:
Open the Calibration example that came with the “HX711_ADC” library.
Open the Arduino Serial Monitor.
Follow the directions in the terminal window. It asks you to put a known mass onto the load cells and then enter the weight of that item. This process calibrates your scale.
I used an items, which is 113 grams. Then it starts outputting the current weight value on the scale.


