Description
Using L298N as the control chip,the module has such characteristics as strong driving ability,low calorific value and strong anti-interference ability. This module can use built-in 78M05 for electric work via a driving power supply part.
Feature:
- L298N Double H Bridge Motor Driver Module
- Control chip: L298N
- Logical voltage: 5V
- Drive voltage: 5V – 35V
- Logical current: 0mA – 36mA
- Drive current: 2A(MAX single bridge)
- Storage temperature: -20°C to +135°C
- Max power: 25W
- Size: 43 x 43 x 27mm
How to get satrted with the L298N Dual Stepper Motor Driver Controller Board
If you plan on working with robots or just building things that move you’ll eventually need to learn how to control a DC motor. The inexpensive L298N H-Bridge module is a simple way to achieve that. Coupling the L298N H-Bridge to a microcontroller like an Arduino will give you the ability to control both the speed and rotation direction of two DC motors.In this article I’ll show you everything you need to know to start adding some motion to your next Arduino project. So let’s get moving.
L298N Module Pinouts
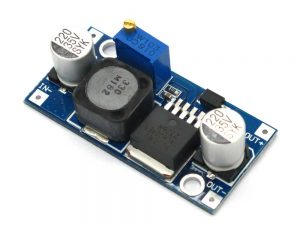
You’ll find a few different styles of L298N boards but they all operate in the same fashion. The board contains an L298N mounted on a heatsink, a 5 volt voltage regulator to “optionally) provide power for logic circuits, supporting diodes and capacitors and connectors as follows:
- Logic inputs for each H-Bridge circuit
- Power supply inputs for the motor power supply
- An optional 5 Volt power input for the logic circuits.
- Outputs for each DC motor
A typical L298N Board is shown here.

If you do use the internal voltage regulator you’ll have to supply the motor power supply with at least 7.5 volts.
Speaking of the motor power supply it needs to be a bit higher voltage than the actual motor requirements. This is due to the internal voltage drop in the transistors that form the H-Bridge circuit. The combined voltage drop is 1.4 volts, so if you are using 6 Volt motors you’ll need to give the board 7.4 volts, if you have 12 volt motors then your motor supply voltage will need to be 13.4 volts.
The board has four input terminals plus two enable terminals. You will use these terminals to control both direction and speed or each motor. They are as follows:
- IN1 – Input 1 for Motor A
- IN2 – Input 2 for Motor A
- IN3 – Input 3 for Motor B
- IN4 – Input 4 for Motor B
- EN1 – Enable line for Motor A
- EN2 – Enable Line for Motor B
In order to simplify things a bit I’ll just discuss the inputs and enable for Motor A, Motor B functions identically.
The two Input lines control the direction that the motor rotates. I will call one direction “forward” and the other one “reverse”, if it makes more sense to you just substitute “clockwise” and “counterclockwise”.
You control motor direction by applying either a Logic 1 (5 Volts) or Logic 0 (Ground) to the inputs. This chart illustrates how this is done.
| INPUT 1 | INPUT 2 | DIRECTION |
| Ground (0) | Ground (0) | Motor Off |
| 5 Volts (1) | Ground (0) | Forward |
| Ground (0) | 5 Volts (1) | Reverse |
| 5 Volts (1) | 5 Volts (1) | Not Used |
As you can see only two combinations are actually used to control the direction of the motors rotation.
The Enable line can be used to turn the motor on, to turn it off and to control its speed. When the Enable line is at 5 Volts (1) the motor will be on. Grounding the Enable line (0) will turn the motor off.
To control the speed of the motor you apply a Pulse Width Modulation (PWM) signal to the Enable line. The shorter the pulse width, the slower the motor will spin.
Using an Arduino with the L298N
Bringing an Arduino or similar microcontroller into the picture allows us to control both the direction and speed of each motor. I am going to show you how to do this using an Arduino Uno but you can also accomplish the same thing with a Mega, Nano or other Arduino compatible controller.
The Arduino Uno has 14 digital Input/Output (I/O) pins, six of which are capable of supplying a PWM signal.
The following diagram shows how I have hooked up the Arduino Uno to the L298N board.

Note that the 5 Volts for the L298N board is now being supplied from the Arduino 5 Volt output. The Arduino itself is being powered via its USB cable, which of course will also allow you to load the sketch to make everything work. After the sketch is loaded you could remove the USB cable and power the Arduino with an external power supply (or a USB supply).
The input and enable lines in the L298N are driven from six Arduino digital output pins, as follows:
| Arduino | L298N |
| 9 | ENA |
| 8 | IN1 |
| 7 | IN2 |
| 5 | IN3 |
| 4 | IN4 |
| 3 | ENB |
I chose this pinout as Arduino output pins 9 and 3 are both capable of Pulse Width Modulation, if you wish you can use alternate pins. Just be sure to modify the sketch to reflect any pinout changes you make.
Speaking of the sketch, here it is:
int enA = 9;
int in1 = 8;
int in2 = 7;

// Motor B

int enB = 3;
int in3 = 5;
int in4 = 4;

void setup()

{

// Set all the motor control pins to outputs

pinMode(enA, OUTPUT);
pinMode(enB, OUTPUT);
pinMode(in1, OUTPUT);
pinMode(in2, OUTPUT);
pinMode(in3, OUTPUT);
pinMode(in4, OUTPUT);

}

void demoOne()

{

// This function will run the motors in both directions at a fixed speed

// Turn on motor A

digitalWrite(in1, HIGH);
digitalWrite(in2, LOW);

// Set speed to 200 out of possible range 0~255

analogWrite(enA, 200);

// Turn on motor B

digitalWrite(in3, HIGH);
digitalWrite(in4, LOW);

// Set speed to 200 out of possible range 0~255

analogWrite(enB, 200);

delay(2000);

// Now change motor directions

digitalWrite(in1, LOW);
digitalWrite(in2, HIGH);
digitalWrite(in3, LOW);
digitalWrite(in4, HIGH);

delay(2000);

// Now turn off motors

digitalWrite(in1, LOW);
digitalWrite(in2, LOW);
digitalWrite(in3, LOW);
digitalWrite(in4, LOW);

}

void demoTwo()

{

// This function will run the motors across the range of possible speeds
// Note that maximum speed is determined by the motor itself and the operating voltage

// Turn on motors

digitalWrite(in1, LOW);
digitalWrite(in2, HIGH);
digitalWrite(in3, LOW);
digitalWrite(in4, HIGH);

// Accelerate from zero to maximum speed

for (int i = 0; i < 256; i++)

{

analogWrite(enA, i);
analogWrite(enB, i);

delay(20);

}

// Decelerate from maximum speed to zero

for (int i = 255; i >= 0; --i)

{

analogWrite(enA, i);
analogWrite(enB, i);

delay(20);

}

// Now turn off motors

digitalWrite(in1, LOW);
digitalWrite(in2, LOW);
digitalWrite(in3, LOW);
digitalWrite(in4, LOW);

}

void loop()

{

demoOne();

delay(1000);

demoTwo();

delay(1000);

}
NOTE: IF you get stray ‘226’ in program The problem is with your = ( and ) – ; > characters. Replace them with ordinary quotes = ( ) – ; > and you should be fine.
Adding Speed Controls
Now that we have the L298N H-Bridge controller working with the Arduino let’s expand upon it. Our demo sketch really isn’t that practical, especially if we are using our motors to drive a robot or toy car. What we really need is a way to take control ourselves. So let’s add some speed controls to our design.
Take a look at the following diagram. Essentially we’ve taken the same circuit and have added a couple of potentiometers. Each potentiometer has one end tied to ground, the other end hooked to 5 volts and the wiper connected to an analog input pin ou the Arduino. The value of the potentiometers isn’t that critical, I used 25k pots as I happened to have a bunch of them but any value from 10k up would work. Going lower than 10k wouldn’t be a good idea though as that would start to consume a bit too much current from the Arduino 5 volt output.

The Arduino Uno has 8 analog input pins and again it really doesn’t matter which ones we use – if you decide to be daring and change pins simply modify the sketch accordingly. I used the first two – Potentiometer A is connected to analog input A0 while potentiometer B goes to analog input A1.
Turning the pots will vary the voltage applied to the inputs from zero to 5 volts. In our sketch we will read these values as numbers from 0 to 1023 (the Arduino Uno has internal 10 bit analog to digital convertors).
Here is the sketch that I used to take the analog values from the potentiometers and use them to control the motor speed. Note that in this sketch I haven’t made any provision to change motor direction.
int enA = 9;
int in1 = 8;
int in2 = 7;

// Motor B

int enB = 3;
int in3 = 5;
int in4 = 4;

// Speed control potentiometers

int SpeedControl1 = A0;
int SpeedControl2 = A1;

// Motor Speed Values - Start at zero

int MotorSpeed1 = 0;
int MotorSpeed2 = 0;

void setup()

{

// Set all the motor control pins to outputs

pinMode(enA, OUTPUT);
pinMode(enB, OUTPUT);
pinMode(in1, OUTPUT);
pinMode(in2, OUTPUT);
pinMode(in3, OUTPUT);
pinMode(in4, OUTPUT);

}

void loop() {

// Set Motor A forward

digitalWrite(in1, HIGH);
digitalWrite(in2, LOW);

// Set Motor B forward

digitalWrite(in3, HIGH);
digitalWrite(in4, LOW);

// Read the values from the potentiometers

MotorSpeed1 = analogRead(SpeedControl1);
MotorSpeed2 = analogRead(SpeedControl2);

// Convert to range of 0-255

MotorSpeed1 = map(MotorSpeed1, 0, 1023, 0, 255);
MotorSpeed2 = map(MotorSpeed2, 0, 1023, 0, 255);

// Adjust to prevent "buzzing" at very low speed

if (MotorSpeed1 < 8)MotorSpeed1 = 0;

if (MotorSpeed2 < 8)MotorSpeed2 = 0;

// Set the motor speeds

analogWrite(enA, MotorSpeed1);
analogWrite(enB, MotorSpeed2);

}
NOTE: IF you get stray ‘226’ in program The problem is with your = ( and ) – ; > characters. Replace them with ordinary quotes = ( ) – ; > and you should be fine.