Description
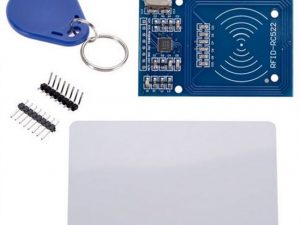
EM-18 RFID Reader is one of the commonly used module for Radio Frequency Identification Projects. It can be directly interfaced with a microcontrollor using UART communication and with a PC using a RS232 converter. This module can work with any 125KHz RFID tags and it can provide UART / Wiegand26 output formats. Pitch of output pins are 2.54mm, thus it can be directly inserted to a breadboard for project developing.
- Supply Voltage : 5V
- Operating Frequency : 125KHz
- Read Distance : 10cm
- Current Rating : < 50mA
Pin Description
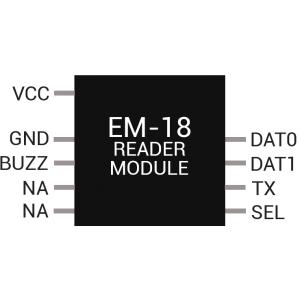
Getting started with EM-18 and Arduino
In this tutorials we are going to see how the EM-18 RFID card reader works and how to interface it with arduino so that you can read the RFID card id, so before going on let ‘s talk a little bit on the EM-18. the EM-18 is the rfid reader that has a resonate frequency of 125Khz which means that the card we are going to use are 125khz cards so make sure that you are using that type of card otherwise will not work
Step1: Hardware required
The following are materials and hardware that are need so that we may achieve our goal of reading the ID of 125Khz rfid cards;
- Arduino UNO
- EM-18 RFID reader
- Breadboard or any prototyping board
- Resistor 100 Ohm
- LED(light emitting diode)
- Jumper wires
Step2: Connecting the hardware
Take the EM-18 so that you can read the words written on it, the following picture shows the pins configuration of the EM-18, but we are not using all of them. for this tutorial we are going to use 3 pins those are Vcc, Tx(transmitter), Buzz, and GND.
To interface the EM-18 on the arduino UNO follow the following circuit daigram but for me I used 5v LED if you don,t have the 5V LED you need to put the 100 Ohm resistor in between the Buzz pin of the EM-18 and the anode pin, in order to protect it.

Step3: Making the sketch and Upload it!
After connecting the hardware we are going to make a sketch that reads and print the RFID tag on the serial monitor. you can download the sketch here. but before uploading the sketch you must disconnect the EM-18 on the Rx pin (digital pin 0) in other to avoid the interference

and after uploading connect it again and the led will light up when the circuit is supplied

open your serial monitor and take a card slash on the EM-18. you will see the card tag in the serial monitor


that’s it!! you have done your first EM-18 and arduino Project! you can do many things using this EM-18 RFID card reader!! so think out of the box and build cool stuffs using the EM-18 RFID card reader!!!!
Step4: Documents
All documents we used for this tutorial, you can download them here